This is default featured slide 1 title

Go to Blogger edit html and find these sentences.Now replace these sentences with your own descriptions.This theme is Bloggerized by Lasantha Bandara - Premiumbloggertemplates.com.

This is default featured slide 2 title

Go to Blogger edit html and find these sentences.Now replace these sentences with your own descriptions.This theme is Bloggerized by Lasantha Bandara - Premiumbloggertemplates.com.

This is default featured slide 3 title

Go to Blogger edit html and find these sentences.Now replace these sentences with your own descriptions.This theme is Bloggerized by Lasantha Bandara - Premiumbloggertemplates.com.

This is default featured slide 4 title

Go to Blogger edit html and find these sentences.Now replace these sentences with your own descriptions.This theme is Bloggerized by Lasantha Bandara - Premiumbloggertemplates.com.

This is default featured slide 5 title

Go to Blogger edit html and find these sentences.Now replace these sentences with your own descriptions.This theme is Bloggerized by Lasantha Bandara - Premiumbloggertemplates.com.

Tuesday, May 20, 2014

အုန္းႏို ့ေခါက္ဆြဲ

အုန္းနုိ႔ ေခါက္ဆြဲ

အုန္းနုိ႔ ေခါက္ဆြဲ (ရေယာက္စာ)
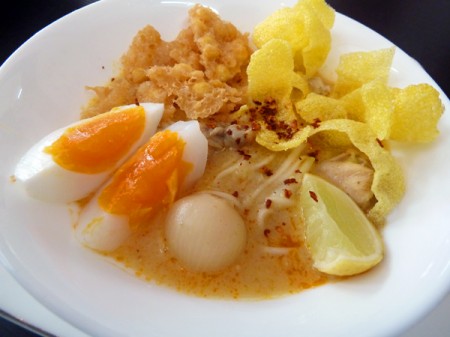
မနက္စာ အုန္းနုိ႔ ေခါက္ဆြဲ ေလးပါ။ အုန္းနုိ႔ေခါက္ဆြဲ ခ်စ္သူ ေတြ သေဘာက်မယ္႔ ခ်က္နည္းေလးပါ။ ၀တ္ရည္ရဲ႔ ပထမဆံုး လက္ရာေလးမို႔ အားေပးၾကပါအုန္းေနာ္။ အိမ္သားေတြကေတာ႔ အရမ္းၾကိဳက္ၾကတယ္။ တခ်ဳိ႔ကလည္း အုန္းနုိ႔ေခါက္ဆြဲကို နုိ႔စိမ္းနဲ႔ ခ်က္တယ္။ ၀တ္ရည္ကေတာ႔ အုန္းနုိ႔နဲ႔ ခ်က္ထားတာပါ။ ခုပဲ လုပ္နည္းေလး ၾကည္႔ရေအာင္…
အုန္းနုိ႔ ေခါက္ဆြဲတြင္ ပါ၀င္ပစၥည္းမ်ား
  • ေခါက္ဆြဲဖတ္ – ၄၀ က်ပ္သား
  • အုန္းနုိ႔နွစ္ – ၁၆၀ ဂရမ္
  • ၾကက္သြန္နီ – ၁၀လံုး (အလံုးေသးမ်ား အခြံႏႊာထားပါ)
  • ပဲအစိမ္းမွုန္႔ – ရ၀ ဂရမ္ (ေရ ၂၅၀ မီလီလီတာျဖင္႔ ပဲမွုန္႔မ်ားကို ေဖ်ာ္ထားပါ)

  • ဆား – စားပြဲတင္ဇြန္း တ၀က္
  • ၾကက္သားမွုန္႔ – စားပြဲတင္ဇြန္း ၁ဇြန္းခြဲ
  • ငံျပာရည္ – စားပြဲတင္ဇြန္း ၃ဇြန္း
  • သၾကား – စားပြဲတင္ဇြန္း ၁ဇြန္း
  • ပဲကပ္ေၾကာ္ – ၁၀ခု
  • မုန္႔ၾကြပ္ေၾကာ္ – ၁ထုပ္ (ဆီမ်ားမ်ားျဖင္႔ ေၾကာ္ေပးပါ)
  • ဘဲဥ – ၃လံုး (က်က္ေအာင္ ျပဳတ္ျပီ စိပ္ေပးထားပါ)
  • ငရုတ္သီး အၾကမ္းမွုန္႔ – အနည္းငယ္
  • သံပရာသီး – ၃လံုး (အစိပ္ေလးမ်ား စိပ္ထားပါ)

ၾကက္သားဆီသပ္ရန္ ပါ၀င္ပစၥည္းမ်ား
  • ၾကက္သား (သို႔) ၾကက္ေတာင္ပံ – ရခု (အတံုးေသးမ်ား တံုးထားပါ)
  • ၾကက္သြန္နီ – ၄လံုး (ဆီသပ္ရန္ ေထာင္းထားပါ)
  • ၾကက္သြန္ျဖဴ – ၂မႊာ (ဆီသပ္ရန္ ေထာင္းထားပါ)
  • ဂ်င္း – လက္တဆစ္ (ဆီသပ္ရန္ ေထာင္းထားပါ)
  • ငရုတ္သီးမွုန္႔ – စားပြဲတင္ဇြန္း ၁ဇြန္း
  • ဆႏြင္းမွုန္႔ – လက္ဖက္ရည္ဇြန္း တ၀က္
  • ဆား – လက္ဖက္ရည္ဇြန္း တ၀က္
  • ၾကက္သားမွုန္႔ – လက္ဖက္ရည္ဇြန္း တ၀က္
ခ်က္ျပဳတ္နည္း
၁။ အရင္ဆံုး ၾကက္သား ဆီသပ္ရန္ ဒယ္ထဲ ဆီထည္႔ ေထာင္းထားေသာ ၾကက္သြန္ျဖဴ၊ ၾကက္သြန္နီ၊ ဂ်င္း မ်ားကို အညိွေရာင္သန္းသည္အထိ ဆီသပ္ေပးပါ။

၂။ ျပီလွ်င္ ငရုတ္သီးမွုန္႔၊ ဆႏြင္းမွုန္႔တုိ႔ကုိ ထည္႔ဆီသပ္ေပးျပီ (ၾကက္သား၊ ဆား၊ ၾကက္သားမွုန္႔) တုိ႔ကို ထည္႔ကာ ၁မိနစ္ခန္႔ လံုးခ်က္ေပးပါ။
၃။ ျပီေနာက္ ၾကက္သား ျမဳပ္ရုံ ေရ ထည္႔ျပီ အဖံုးအုပ္ထားပါ။
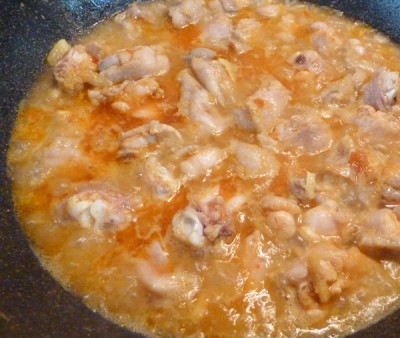
၄။ ၾကက္သား နူျပီ ဆီျပန္ျပီဆုိလွ်င္ ဒယ္အုိးၾကီးထဲ ၾကက္သားမ်ားကို ေျပာင္းထည္႔လုိက္ပါ။
၅။ ထုိ႔ေနာက္ ေရ(၂လီတာ) အုိးထဲသို႔ ေလာင္းထည္႔ကာ ဆူေအာင္ တည္ထားေပးပါ။
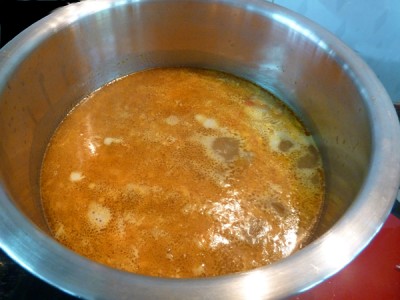
၆။ ဆူလာလွ်င္ ေရျဖင္႔ ေရာေဖ်ာ္ထားေသာ ပဲစိမ္းမွုန္႔မ်ားကို ေလာင္းခ်ေပးျပီ သမေအာင္ ေမႊေပးပါ။
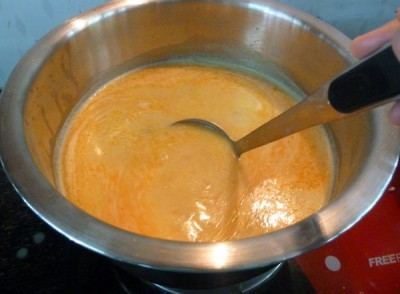
ရ။ ထုိ႔ေနာက္ အုန္းနုိ႔နွစ္မ်ားကို ထည္႔ျပီ ဆား(စားပြဲတင္ဇြန္း ၁ဇြန္း)၊ ၾကက္သားမွုန္႔(စားပြဲတင္ဇြနး္ ၁ဇြန္းခြဲ)၊ ငံျပာရည္(စားပြဲတင္ဇြန္း ၃ဇြန္း)၊ သၾကား(စားပြဲတင္ဇြန္း ၁ဇြန္း) တုိ႔ကုိ ထည္႔ေပးျပီ ေရာေမႊပါ။
၈။ အရသာ ျမည္းလို႔ အေနေတာ္ျပီဆုိမွ ၾကက္သြန္နီလံုးမ်ားကို ထည္႔ျပီ ၂မိနစ္ခန္႔တည္ေပးျပီ အုန္းနုိ႔ ေခါက္ဆြဲ အရည္အုိးကို မီးပိတ္လုိက္ပါ။
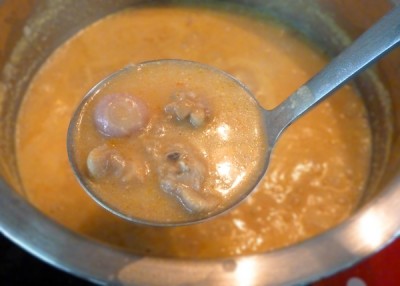
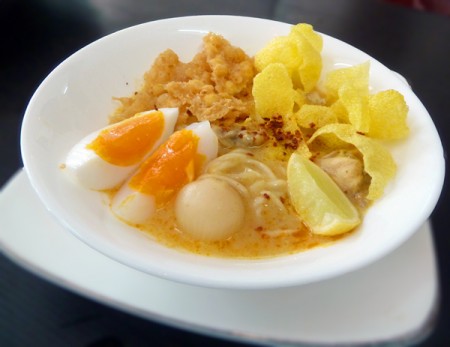
၉။ အုန္းနုိ႔ေခါက္ဆြဲ စားရန္ ပန္းကန္ခြက္တစ္ခုထဲ ေခါက္ဆြဲဖတ္၊ ပဲၾကပ္ေၾကာ္၊ မုန္ၾကြပ္၊ ဘဲဥ၊ သံပရာသီး၊ ငရုတ္သီးၾကမ္းမွုန္႔၊ အုန္းနုိ႔ေခါက္ဆြဲရည္ တုိ႔ျဖင္႔ အရသာရွိစြာ သံုးေဆာင္နုိင္ပါျပီ…


အဆင္ေျပရင္ fb ေလး like လုပ္ေပးခဲ့ပါေနာ္>>>> ( ဒီမွာ )

အနီေရာင္ေလးဆိုက္မွ ကူယူ မ်ွေဝ လိုက္ပါတယ္

ရန္ကုန္ မုန္ ့ဟင္းခါး

ရန္ကုန္ မုန္႔ဟင္းခါး (အိုးဘဲဥ)

ရန္ကုန္ မုန္႔ဟင္းခါး (အုိးဘဲဥ)

မုန္႔ဟင္းခါးကို ျမန္မာလူမ်ဳိးတုိင္း မနက္စာအျဖစ္ အလြန္မွ ၾကိဳက္နွစ္သက္ၾကပါတယ္။ မုန္႔ဟင္းခါးကို ဆုိင္ေတြမွာ ၀ယ္စားတာမ်ားေပမယ္႔ အိမ္မွာ ကိုယ္တုိင္လုပ္စားခ်င္သူမ်ားအတြက္ အထူးရည္ရြယ္ထားပါတယ္။ မုန္႔ဟင္းခါးထဲမွာမွ အိုးဘဲဥ မုန္႔ဟင္းခါးမွ ၀တ္ရည္က ၾကိဳက္တာ။ ဒါေပမယ္႔ ၀တ္ရည္ အရင္က မုန္႔ဟင္းခါး တစ္ခါမွ ကိုယ္တုိင္မခ်က္ဖူးဘူး၊ အေဒၚတုိ႔၊ အေမတုိ႔ ခ်က္တာေတြပဲ ကပ္စားေနတာ။ ဒီေန႔ေတာ႔ ကိုယ္တုိင္ ခ်က္စားခ်င္တယ္၊ ျမန္မာရုိးရာဓေလ႔ျဖစ္တဲ႔ မုန္႔ဟင္းခါးေတာင္ မခ်က္ဖူးရင္ မေကာင္းဖူးရယ္လုိ႔ ေတြးမိတယ္။ ဒါေၾကာင္႔ စခ်က္တဲ႔အေနနဲ႔ မုန္႔ဟင္းခါး ၁ပိသာစာ တအိမ္သားလံုး စားလို႔ရေအာင္ ခ်က္ျဖစ္သြားတယ္။ အေဒၚေပးတဲ႔နည္းအတုိင္း ခ်က္လုိက္တဲ႔ အရသာက တကယ္ဂြတ္ရွယ္ပဲ၊ အိမ္သားေတြလည္း အရမ္းအားေပးၾကတယ္။ ဒါေၾကာင္႔ ခ်က္နည္း အဆင္႔ဆင္႔ကို ပံုနွင္႔တကြ ေဖာ္ထားထားေပးလိုက္ပါတယ္…
ရန္ကုန္ မုန္႔ဟင္းခါးအတြက္ ပါ၀င္ပစၥည္းမ်ား
၁။ မုန္႔ဟင္းခါးဖတ္ – ၁ပိသာ

၂။ ငါးခူး – ၄၀ က်ပ္သား (ငံျပာရည္၊ ဆႏြင္းမွုန္႔၊ စပါးလင္ ေရနည္းနည္းျဖင္႔ ျပဳတ္ျပီ အသားထြင္ထားေပးပါ)

၃။ ငေပ်ာအူ – ၁အူ (အရင္႔မ်ားဖယ္ျပီ အနုမ်ားကို ပါးပါးလီွးျပီလွ်င္ ဆႏြင္း(လက္ဖက္ရည္ဇြန္း ၁ဇြန္း)ထည္႔ကာ ေရေရာ စိမ္ထားေပးပါ)
မွတ္ခ်က္ ။ ။ ဆႏြင္းစိမ္ျခင္းမွာ ငေပ်ာအူမ်ား မမဲသြားရန္ျဖစ္သည္။

၄။ ဆန္ေလွာ္မွုန္႔ – ၁၀၀ ဂရမ္ (ေရျဖင္႔ ေဖ်ာ္ထားေပးပါ)
၅။ ကုလားပဲ – ၁၀က်ပ္သား (နူးအိေအာင္ ေရျဖင္႔ျပဳတ္ထားျပီ blenderျဖင္႔ ၾကိတ္ထားေပးပါ)
မွတ္ခ်က္ ။ ။ ကုလားပဲျပဳတ္ရည္ အခ်ဳိရည္မ်ားကို မုန္႔ဟင္းခါးခ်က္ထဲ ထည္႔ရန္ သိမ္းထားပါ။
၄။ နံနံပင္၊ ပဲသီး၊ ပူစီနံ – ၁စည္း (ပါးပါးလွီးထားပါ)

၅။ ပဲေၾကာ္
၆။ ဘဲဥ – ၁၀လံုး (က်က္ေအာင္ ျပဳတ္ထားေပးပါ)
ရ။ ၾကက္သြန္နီ – ၂၀လံုး (အခြံခြာထားေပးပါ)


ဆီသပ္ရန္ ပါ၀င္ပစၥည္းမ်ား
၁။ ၾကက္သြန္နီ – ၂၀က်ပ္သား (ေထာင္းထားပါ)
၂။ ၾကက္သြန္ျဖဴ – ၁၅က်ပ္သား (ေထာင္းထားပါ)
၃။ ဂ်င္း – ၅က်ပ္သား (ေထာင္းထားပါ)
၄။ စပါးလင္ – ၃ပင္ (နွုတ္နွုတ္စဥ္းထားပါ)
၅။ ဆီ – ၁၀က်ပ္သား
၆။ ငရုတ္ပြနီ – ၅ေထာင္႔ (ေထာင္းျပီ ၾကိတ္ထားကာ ငရုတ္သီးနွစ္ယူပါ)
ရ။ ဆႏြင္းမွုန္႔ – လက္ဖက္ရည္ဇြန္း ၁ဇြန္း
၈။ ငရုတ္ေကာင္းမွုန္႔ – စားပြဲတင္ဇြန္း ၁ဇြန္း အေမာက္
ျပင္ဆင္နည္း
၁။ ငါးခူးကို ငံျပာရည္(လက္ဖက္ရည္ပန္းကန္လံုး တ၀က္)၊ ဆႏြင္းမွုန္႔(လက္ဖက္ရည္ဇြန္း ၃ပံု၁ပံု)၊ စပါးလင္(၁ပင္)ကို ခ်ည္ျပီ ျပဳတ္ေပးထားပါ။
၂။ ျပီးလွ်င္ ျပဳတ္ျပီသား ငါးခူးကို အသားႏြင္းေပးပါ။

၃။ ရလာေသာ ငါးခူးအရုိးမ်ားကို စပါးလင္(ပါးပါးလွီးထားေသာ စပါးလင္မ်ားျဖင္႔ ေရာျပဳတ္ေပးပါ။ ျပီမွ အရုိးျပဳတ္ေရမ်ားကို စစ္ယူထားျပီ ဖယ္ထားေပးပါ။
ခ်က္ျပဳတ္နည္း
၁။ ဒယ္အိုးထဲသုိ႔ ဆီထည္႔ျပီ ဆီပူလာလွ်င္ ေထာင္းထားေသာ ၾကက္သြန္ျဖဴ၊ ၾကက္သြန္ျဖဴ၊နီ၊ စပါးလင္၊ ဂ်င္းတုိ႔ကို အရင္ ဆီသပ္ေပးပါ။

၂။ ေနာက္မွ ငရုတ္သီးအနွစ္၊ ဆႏြင္းမွုန္႔တို႔ကို ထည္႔ေရာေမႊလိုက္ပါ။
၃။ ျပီေနာက္ ငါးအသားမ်ားထည္႔၊ ငရုတ္ေကာင္းမွုန္႔ (လက္ဖက္ရည္ဇြန္း ၁ဇြန္း)စာ ထည္႔ေမႊလိုက္ပါ။
၄။ အရသာအေပါ႔အငံ႔အတြက္ ဆား(လက္ဖက္ရည္ဇြန္း ၁ဇြန္း)၊ ၾကက္သားမွုန္႔ (လက္ဖက္ရည္ဇြန္း ၁ဇြန္း) ထည္႔ေပးပါ။

မုန္႔ဟင္းခါး စခ်က္ပါေတာ႔မည္
၅။ ငါးဆီသပ္ျပီလွ်င္ မုန္႔ဟင္းခါးခ်က္ရန္ ဒယ္အုိးၾကီး တစ္ခုထဲသို႔ (ငါးဆီသပ္၊ ပဲျပဳတ္ရည္၊ ငါးအရိုးျပဳတ္ရည္မ်ား၊ ေရ(၂လီတာ)၊ စပါးလင္(၂ပင္ ခ်ည္ျပီသား))တုိ႔ကို ထည္႔ကာ ေရာေမႊလိုက္ပါ။
၆။ ျပီလွ်င္ ေရျဖင္႔ေဖ်ာ္ထားေသာ ဆန္ေလွာ္မွုန္႔၊ blender နဲ႔ၾကိတ္ထားေသာ ပဲမ်ားကို ထည္႔ျပီ ေရာေမႊေပးပါ။
ရ။ ထုိ႔ေနာက္ ဆူေအာင္ တည္ထားျပီမွ အေပါ႔အငံ႔အတြက္ ၾကက္သားမွုန္႔၊ ငံျပာရည္(၁ခြက္)၊ ဆား(စားပြဲတင္ဇြန္း ၁ဇြန္း)၊ သၾကား(စားပြဲတင္ဇြန္း ၁ဇြန္း)တုိ႔ကို ထည္႔ေပးပါ။
၈။ ဆန္ေလွာ္မွုန္႔ ပြလာမွ ငေပ်ာအူမ်ား ထည္႔ေပးပါ။
၉။ ငေပ်ာအူႏူျပီဆုိလွ်င္ ျပဳတ္ထားေသာ ဘဲဥမ်ား နွင္႔ ငရုတ္ေကာင္းမွုန္႔(စားပြဲတင္ဇြန္း တ၀က္) ျဖဴးေပးပါ။
၁၀။ က်က္ခါနီးမွ ၾကက္သြန္နီမ်ားကို အလံုးလိုက္ ထည္႔လိုက္ပါ။


၉။ ၾကက္သြန္နီမ်ား နူသြားလွ်င္ မီးပိတ္ထားျပီ ပန္းကန္တစ္ခုထဲ မုန္႔ဟင္းခါးဖတ္ ၁၀က်ပ္သား၊ နံနံပင္၊ ပဲေၾကာ္မ်ားျဖင္႔ ျပင္ဆင္ထားပါ။

၁၀။ မုန္႔ဟင္းခါးရည္မ်ားထည္႔ျပီ အုိးဘဲဥ ရန္ကုန္မုန္႔ဟင္းခါးကို အရသာရွိစြာ သံုးေဆာင္နုိင္ပါျပီ…..


အဆင္ေျပရင္ fb ေလး like လုပ္ေပးခဲ့ပါေနာ္>>>> ( ဒီမွာ )

အနီေရာင္ေလးဆိုက္မွ ကူယူ မ်ွေဝ လိုက္ပါတယ္

★★ Stardock WindowBlinds v.8.05 + Crack ★★

မိမိ Windows ကို (skins) လန္းလန္းေလးေတြသံုးခ်င္သူေတြအတြက္ visual styles WindowBlinds (skins) ဒီဇိုင္းေလးေတြအမ်ိဳးစံုပါတာေလးကိုတင္ေပးလိုက္ပါတယ္။logon/logoff dialogs,"please wait" dialog, backgrounds  Control Panel ႏွင့္အျခားေသာ folders, အားလံုးကိုေျပာင္းေပးမယ့္ Latest version ေလျဖစ္တဲ့ Stardock WindowBlinds ေလးပါပဲ။Windows 7/8 and Windows Server 2008 R2/2012 တြင္သာအသံုးျပဳႏိုင္သည္။Full ျဖစ္ေစဖို႔အတြက္ Crack ဖိုင္ကိုထည့္သြင္းေပးထားပါတယ္။


WindowBlinds is a program that enables Windows users to completely change the look and feel of the Windows user interface. Users customize Windows by using visual styles (skins) created for WindowBlinds. WindowBlinds skins virtually every aspect of the Windows GUI that one can imagine. And in fact, the enhanced visual styles used by WindowBlinds can skin things previously not thought to be skinnable such as logon/logoff dialogs, the "please wait" dialog, backgrounds in the Control Panel and other special folders, and more. Latest version works with Windows 7/8 and Windows Server 2008 R2/2012.

Visual Styles
Select from the many skins included with WindowBlinds or choose from thousands of skins available for download at WinCustomize.com

Alternative Skins
Some skins have multiple sub-styles that can be applied to suit your personal tastes. You can also save your style combinations as presets for quick access later.

Modify Skins
Personalize any of the default Windows themes or any skins downloaded from WinCustomize.com

Fonts
Easily change which fonts your skins use.

Colors
Find a great skin, but want to change the color scheme? WindowBlinds enables instant color changes from its configuration menu.

Textures
Personalize any skin by applying one of the textures included with WindowBlinds or use one of your own creations.

Explorer Backgrounds
Tired of looking at those boring white explorer windows? Customize them with unique explorer backgrounds.

Easy set-up
We have simplified the configuration menu to make personalizing your desktop quick and intuitive. Instantly preview your selections and adjustments before you apply them to your desktop.

Presets
Any changes and adjustments you make to a skin can be saved as a preset. Presets enable you to access previous customizations and apply them to a skin quickly.

Randomized Skins
WindowBlinds enables you to change skins randomly at timed intervals. Your desktop will never be boring again when you are treated to a new skin every time you logon.

Per application skinning
Choose skins for each of your application types. For example, WindowBlinds enables your word processing software to use a different skin than your design programs.

Design your own skins
Each purchase includes SkinStudio, the powerful companion application for WindowBlinds that enables you to create your own skins. Edit controls, start menu, taskbars, explorer windows, fonts, colors backgrounds and more with SkinStudio.

Easy to use
Customize only the parts of the Windows interface you want to change and SkinStudio will do the rest. This makes it easy for inexperienced users to create a great skin quickly. Advanced users can still enjoy designing every aspect of the Windows interface.

Changes in WindowBlinds 8.05:
* Fix for blank desktop on logon with optional May KB2955164 update (you can hold Ctrl while logging on to bypass WB)
* Updates to support Google Chrome v36 (currently dev channel) including 64-bit Google Chrome
* Skin tweaks and fix for “V” skin recolouring issues

Installation
install the setup
then copy and paste the CRACK in installation folder and run the CRACK


က်ြန္ေတာ္တင္သမွ်ပိုစ့္ေတြ Facebook ကေနရယူခ်င္တယ္ဆိုရင္  ဒီမွာ Like ႏွိပ္ပါ။
မန္ဘာ၀င္ခဲ့ျခင္းျဖင့္ ပိုစ့္အသစ္တင္တိုင္း မိမိ Gmail ထဲကိုတိုက္ရိုက္ေရာက္ရွိမည္ျဖစ္ပါသည္။
ထို႔ေၾကာင့္မန္ဘာ၀င္ခဲ့ဖို႔ဖိတ္ေခၚပါတယ္။


Monday, May 19, 2014

photoshop နဲ႔ အပံုျဖတ္နည္းေလးနဲ႔ ေနာက္ခံပံုေျပာင္းနည္း

လာပါျပီ ေတာင္းဆိုထားတဲ့ သူငယ္ခ်င္းမ်ားအတြက္ photoshop နဲ႔ အပံုျဖတ္နည္းေလးနဲ႔ ေနာက္ခံပံုေျပာင္းနည္း ေလး က်ြန္ေတာ္မအားတဲ့ၾကားက တက္သေလာက္ေလး သိသေလာက္ေလးကို ၾကိဳးစားျပီးမ်ွေဝ တင္ေပးလိုက္ပါတယ္ဗ်ာ မသိေသးတဲ့ေဘာ္ေဘာ္ေတြလဲ သိရတာေပါ့ေနာ္ လုပ္ပံုလုပ္နည္းေတြက အမ်ားၾကီးရွိပါတယ္ အမ်ားၾကီးထဲမွ က်ြန္ေတာ္သိတာေလး အလြယ္ကူဆံုးေလးကို ပံုနွင့္ တကြ vdo ဖိုင္ေလးပါ၊ အခ်ိန္ေပးျပီး လုပ္ခ်င္သူေတြလုပ္တက္ေအာင္တင္ေပးလိုက္ပါတယ္ေနာ္၊ သိထား တက္ထားတဲ့ ဆရာမ်ားေတာ့ေက်ာ္သြားပါေနာ္ ၊ က်ြန္ေတာင္တင္သမ်ွ ပိုစ္ေတြမွာ အမွားေလးေတြပါခဲ့ရင္ ခြင့္လြတ္ေပးၾကပါလို႔ ဆရာမ်ားကေတာ့အမွားမ်ားပါရင္ ေထာက္ျပေပးနိုင္ပါေပးနိုင္ပါတယ္ေနာ္ ၊ခုမွေလ့လာ ပို႔ခ်ေနသူေလးမို႔ပါ .......

ကဲစရေအာင္ စကားနည္းနည္းမ်ားသြားတယ္ ေဆာတီးေနာ္
(၁)ပံုမွာျပလားသလို open ဖြင့္ျပီး ကိုယ္လုပ္မယ့္ ေနာက္ခံပံုနဲ႔ ျဖက္မယ့္ပံုကို ဆဲြထည့္လိုက္ပါ


(၂)ပံုမွာျပထားတာေတာ့ (၁)မ်ွားမွာျပထားတဲ့ ဟာေလးက အပံုကိုအၾကီးအေသးလုပ္တာပါ (၂)မ်ွားမွာျပထားတာကျဖက္ဖို႔ အရာလိုက္ေပးတဲ့toolေလးပါ (၃)မ်ွးမွာျပထားတာေတာ့ ကိုယ္စအရာမယ့္ေနရာေပါ့ ၾကိဳက္တဲ့ေနရာကစအရာေပးလို႔ရပါတယ္


(၃)ပံုမွာျပထားတာေတာ့ ကိုယ္စျပီးအရာေပးတဲ့ေနရာကေန စဆြဲသြားျပီး အပံုရယ္အျပင္ဘက္ကေနဆြဲသြားျပီး အစေနရာမွာျပန္လာဆက္ရမွာပါ ဆက္ျပီးသြားလို႔ အပံုမွာျပလားသလိုေပၚရင္(၂)မ်ွားမွာျပလားတဲ့ tool ေလးနိုပ္လိုက္ပါ နိုက္ျပီး ဝိုင္းေနတဲ့အထဲလိုက္ျဖတ္ေပးလိုက္ပါ နားမလည္ရင္ vdo ဖိုင္ၾကည့္ရင္နားလည္မွာပါ


(၄)ပံုမွာေတာ့ ျဖက္လိုက္တာ(၁)မ်ွားမွာ အျဖဴ ျဖစ္ေနတယ္ ဘာေၾကာင့္လဲ (၂)မ်ွားမွာျပထားပါတယ္ ေသာ့ရွိေနလို႔ပါ


(၅)မွာျပထားသလို ေသာ့ရွိေနတဲ့ေနရေလးကို ေမာက္နဲ႔ ၂ ခ်တ္နိုက္လိုက္ရင္ ေဘာက္ေလးတစ္ခုတက္လာရင္ ok ေျဖေပးလိုက္ရပါျပီ၊


(၆)မွာျပထားသလို ေသာ့မရွိသလို အျဖဴလဲမေပၚမွ ကိုယ္လိုရာေရာက္မွာ ေနာက္က်န္တဲ့ေနရာေတြကို ပထမလုပ္သလိုလိုက္ျဖတ္လိုက္ပါေနာ္၊

(၇)ပံုမွာေတာ့ျဖတ္လို႔ျပီျပီးေပါ့ (၁)မ်ွားမွာျပထားသလို အပံုကိုပါေအာင္လို႔ ကီးဘုက္ေပၚမွာ ctrl+t ကိုနိုပ္ ဆက္ျပီး ctrl+c နိုပ္ပါ ပါေနာ္ ေနာက္ (၂)မ်ွားမွာျပထားတဲ့ tool ေလးျပန္နိုပ္ေပးပါ မွတ္ခ်တ္ တစ္ခုခုလုပ္ျပီးတိုင္း ျပင္ျပီးတိုင္း (၂)မ်ွားေလးျပန္နိုပ္ဖို႔မေမ့ပါနဲ႔ေနာ္

(၈) မွာေတာ့(၁) မ်ွားမွာျပထားတာက (မ်ွားက ေနာက္ခံပံုေလးထဲ ကိုခုဏကctrl+c နဲ႔ေကာ္ပီလုပ္လာတာကို ctrl+v ေလးနိုပ္ေပးလိုက္ရံုပါဘဲ

(၉)မွာေတာ အဝိုင္း အေသးမွာျပထားတာ အရင္နိုပ္ျပီး အေပၚဘားက အဝိုင္းၾကီးျပထားသလို ကိုယ္လိုတာေရြးျပီး စိတ္တိုင္းက် ဆက္ျဖက္နိုင္ပါတယ္ သတိ ညာဖက္မွာျပလားသလို ကိုယ္ျဖက္မယ့္အပံုကို ျပာေပးလားပါ

(၁၀)ျပထားတာကေတာ့ (၁)မ်ွးကေတာျပင္ျပီးတိုင္နိုပ္ေပးရမွာပါ ဘာေၾကာင့္လဲဆိုေတာ့ လိုတဲ့အပံုကို ကိုယ္ထားခ်င္တဲ့ေနရာထားလို႔ေရြ႔လို႔ရေအင္လို႔ပါ  (၂) မ်ွားကေတာ့
 က်ြန္ေတာ္ထပ္ထည့္လိုက္တဲ့ အပံု ကားပံုေပါ့ မိန္းကေလး အပံုအေရွ့မွာထားမယ္ဆို မိန္းကေလးအပံု အေပၚပို႔ရမွာပါ အေနာက္မွာ ထားမယ့္အတြတ္ မိန္းကေလးအပံုရယ့္ေအာက္မွာထားတာပါ

(၁၁)ကေတာ့ အားလံုးျပီးလို႔ သိမ္းေတာ့မွာပါေအာက္ က အရင္ျပထားတဲ့အပံု ကလို file ကိုနိုပ္ျပီး save as..ကိုနိုပ္ပါ၊ ျပီးရင္သိမ္းမယ္ေနရာ ကိုယ္ထားခ်င္တဲ့ေနရာေရြးျပီးရင္ (၁)မ်ွားျပထားတဲ့ေနရာမွာ ကိုယ္ေရးခ်င္တဲ့နမည္ေပးေပါ့ (၂) မ်ွားမွာျပထားတဲ့ေနရာမွာေတာ့ (၃) မ်ွားမွာ ဝိုင္းျပီးျပေပးထားပါတယ္ jpeg နွစ္ခု ျဖစ္ေနလို႔ ဝိုင္းျပီး ျပေပးထားတာပါ။


ကဲဒီေလာက္ဆိုနားလည္ေလာက္မွာေနာ္ နားမလည္းေသးရင္ေတာ့ ေအာက္မွာ vdo ဆက္ၾကည့္ေပးပါ vdo ကိုသိမ္းခ်င္တယ္ လိုခ်င္တယ္ဆိုင္ရင္ေတာ့ေအာက္မွာေဒါင္းလိုက္ပါေနာ္ မွားတာေလးမ်ားပါရင္ ခြင့္လြတ္ေပးပါလို႔ထက္ေျပာလိုက္ပါရေစ.......။

ၾကိဳးစားေနလ်ွပ္>>>kooo<<<<


ေက်းဇူးျပဳျပီး fb ေလး LIKE ေလးလုပ္ေပးျခင္းျဖင္အားေပးပါေနာ္


Sunday, May 18, 2014

Free Download Windows 7 OS မ်ား ရနိုင္ပါျပီ

5 / 11 / 2011
Windows 7 လိုခ်င္တယ္ ဆိုလို တင္ေပးလိုက္ပါ။  ကိုယ္ၾကိဳက္တဲ့ OS ဖိုင့္ကို downloads သာ လုပ္လိုက္ပါ..မိမိၾကဳိနွစ္သက္ရာ ကို ေဒါင္းယူ
ထားပါ။  Windows 7အသစ္တင္ခ်င္တဲ့အခါ အစဥ္ေျပတာေပါ့။
 
                                    Windows 7 Professional.


Windows 7 Professional Direct Download Links:


32-bit Windows 7 Professional x86: Download Here.
File Size: 2.04 GB
MD5: D5CC1E45D6EB57B8500DBCF622F39637

64-bit Windows 7 Professional x64: Download Here.
File Size: 2.66 GB
MD5: 7B29E21B7F6BC0850E65085205B5EAFE

Windows 7 Professional Direct Download Links In ISO:

32-bit Windows 7 Professional x86: Download Here.

64-bit Windows 7 Professional x64: Download Here.

                          Windows 7 Ultimate.


Windows 7 Ultimate ISO Download Links:

32-bit Windows 7 Ultimate x86 ISO: Download Here.

64-bit Windows 7 Ultimate x64 ISO: Download Here.


                             Windows 7 Home Premium.


Windows 7 Home Premium ISO Download Links:

32-bit Windows 7 Home Premium x86: Download Here.

64-bit Windows 7 Home Premium x64: Download Here.


                                  Windows 7 Enterprise.


Windows 7 Enterprise Direct Download Links:

32-bit Windows 7 Enterprise x86: Download Here.

64-bit Windows 7 Enterprise x64: Download Here.

                                   Windows 7 Home Premium N.


Windows 7 Home Premium N Direct Download Links:

Windows 7 Home Premium N x86 (32-bit): Download Here.

Windows 7 Home Premium N x64 (64-bit): Download Here.


                                    Windows 7 Professional N.

Windows 7 Professional N Direct Download Links:

Windows 7 Professional N x86 (32-bit): Download Here.
 
  Windows 7 Professional N x64 (64-bit): Download Here.  


က်ြန္ေတာ္တင္သမွ်ပိုစ့္ေတြ Facebook ကေနရယူခ်င္တယ္ဆိုရင္  ဒီမွာ Like ႏွိပ္ပါ။

မန္ဘာ၀င္ခဲ့ျခင္းျဖင့္ ပိုစ့္အသစ္တင္တိုင္း မိမိ Gmail ထဲကိုတိုက္ရိုက္ေရာက္ရွိမည္ျဖစ္ပါသည္။

ထို႔ေၾကာင့္မန္ဘာ၀င္ခဲ့ဖို႔ဖိတ္ေခၚပါတယ္။

Window 7 အေခြကို လိုခ်င္ေနတဲ့ သူငယ္ခ်င္း မ်ား အတြက္

Window 7 အေခြကို လိုခ်င္ေနတဲ့ သူငယ္ခ်င္းမ်ားအတြက္ အဆင္ေျပေအာင္ direct links ေလးေတြမွ်ေ၀ ေပးလိုက္ပါတယ္။ မူရင္းလင့္ကေန ေဒါင္းယူရမွာျဖစ္ တဲ့အ တြက္   ေအာက္ က လင့္ေလးေတြကို တစ္ခ်က္ႏွိပ္ၿပီးေဒါင္းယူႏိုင္ပါတယ္။ ရလာတဲ့ ISO ဖိုင္ကို အေခြကူးဖို႕အတြက္ စက္ထဲကို DVD အေခြလြတ္ တစ္ခ်ပ္ထည့္လိုက္ပါ။  ISO  ဖိုင္ ကို double click ႏွိပ္လိုက္တာနဲ႕ Nero ထည့္ထားၿပီးသား စက္မ်ားကေတာ့ Nero တန္းတက္လာပါလိမ့္မယ္။ Nero ကိုေတာ့ လူတိုင္းထည့္ထားပါတယ္ေနာ္။   Boot တက္ဖို႕ အတြက္ Verify Disc Data ဆိုတဲ့ေနရာမွာ အမွန္ျခစ္ကေလးေပးၿပီး ကူးေပးပါ။ ေအာက္မွာ လိုအပ္တာကိုေဒါင္းႏိုင္ပါၿပီခင္ဗ်ာ။ Full version ျဖစ္ဖို႕အတြက္ window loader ေလးပါတင္ေပးထားပါတယ္။ကြန္နက္ရွင္ေကာင္းသူမ်ားကေတာ့ေဒါင္းယူထားသင့္ပါတယ္။Resume download လည္းပါတယ္။ ကၽြန္ေတာ္ကိုယ္တိုင္ စမ္းၿပီးပါၿပီ ။ တစ္ေန႕ နည္းနည္း ေဒါင္းေပါ့ဗ်ာ။ အားလံုးအဆင္ေျပၾကပါေစဗ်ာ။
 Download  Window 7 Ultimate SP1 – U ISO x86 (32bit) 2.38G

Download Window 7 Ultimate SP1  – U ISO x64 (64bit) 3.09G

Download Window Loader v-2.00 =>> Link 1/ Link 2 


က်ြန္ေတာ္တင္သမွ်ပိုစ့္ေတြ Facebook ကေနရယူခ်င္တယ္ဆိုရင္  ဒီမွာ Like ႏွိပ္ပါ။

မန္ဘာ၀င္ခဲ့ျခင္းျဖင့္ ပိုစ့္အသစ္တင္တိုင္း မိမိ Gmail ထဲကိုတိုက္ရိုက္ေရာက္ရွိမည္ျဖစ္ပါသည္။

ထို႔ေၾကာင့္မန္ဘာ၀င္ခဲ့ဖို႔ဖိတ္ေခၚပါတယ္။

Genuine ျဖစ္ျပီးသား ေနာက္ဆံုးထြက္ Windows 7 Regal Business Edition 2014 SP1 x86 Activated (3.42 Gb)


အခု ၉-လပိုင္း(Sep/2013) မွာ ထြက္လာတဲ့ Windows 7 Regal Business Edition 2014 SP1 x86 ကို
တင္ေပးလိုက္ပါျပီ။Icon,Folder Icon,Startup Menu,Gadget,Windows Theme မ်ား တကယ္လန္းျပီး
ဂိမ္းၾကိဳက္သူမ်ားအတြက္ ဂိမ္းေတြကို ျမန္ျမန္ဆန္ဆန္ ကစားနိုင္တဲ့  Windows 7 Regal Edition ျဖစ္ပါ
တယ္။Desktop Gadget လဲ (၂ဝဝ) ရာေက်ာ္ပါဝင္ပါတယ္။
Activated လုပ္ေပးျပီး Genuine ျဖစ္ျပီးသားမို႔ Activate ထပ္၍ လုပ္စရာမလိုပါ။Boot လုပ္ျပီးတာနဲ႔ အသင့္
သံုးရံုပါဘဲ။
Windows 7 Regal Business Edition 2014 SP1 x86 မွာပါဝင္တဲ့ ေဆာ့ဝဲေတြကေတာ့...
Adobe Flash Player(IE)
Adobe Flash Player(Non IE)
(Browser ဖြင့္ျပီး Youtube မွအစ ဗီဒီယိုေတြ ၾကည့္ရင္တျခား Edition ေတြလို Flash Player သီးသန္႔
အင္စေတာလုပ္စရာမလိုပါ။)
CCleaner
Google Chrome
WiFi,Wireless,WLan Drivers မ်ားနဲ႔ အျခား Drivers မ်ား ကိုဝင္းဒိုးတင္ျပီးတာနဲ႔ စက္မွာ အင္စေတာလုပ္ျပီး
သားေတြ႔ရပါမယ္။
စိတ္ဝင္စားလို႔ သံုးၾကည့္ခ်င္ရင္ ေအာက္မွာေးါင္းလုပ္ယူလိုက္ပါ။ဖိုင္ဆိုဒ္က 3.42 Gb ျဖစ္လို႔ RAR ဖိုင္ (၆)ဖိုင္ခြဲ
ျပီးတင္ထားေပးပါတယ္။
ဖိုင္(၆)ဖိုင္လံုးကို ေဒါင္းလုပ္ယူျပီး Select All လုပ္ပါ။ျပီးရင္ WinRAR နဲ့ Extract လုပ္ပါ။Windows ISO ဖိုင္တဖိုင္ထဲျပန္ထြက္လာပါမယ္။
(ဖိုင္ခြဲတာက WinRAR နဲ႔မို႔ Select All လုပ္ျပီး WinRAR နဲ႔ Extract လုပ္ရံုပါ။ဘာျပႆနာမွမရွိပါ။)
ISO ဖိုင္ကို DVD (သို႔) USB Flash Drive (4 Gb) မွာ Power ISO/Windows 7 USB Tool တို႔ကိုသံုးျပီး
Bootable Image အျဖစ္ Burn ပါ။ျပီးရင္ ဝင္းဒိုးတင္နိုင္ပါျပီ။

***Kaspersky/AVG/MSE တို႔ျဖင့္ Virus Scan Checked လုပ္ျပီးသားျဖစ္လို႔

  စိတ္ခ်လက္ခ် အသံုးျပဳနိုင္ပါတယ္။***

Part 1    Download

Part 2   Download

Part 3   Download

Part 4   Download

Part 5   Download

Part 6   Download

             Screen Shots မ်ား....ၾကည့္ရန္  ဒီမွာ ကလစ္ပါ